Showing posts with label plants. Show all posts

Tuesday, April 2, 2019

Propagating Succulents like a Pro - Easy DIY Gardening Project


Succulents are fun, colorful and easy to grow as long you give them the correct conditions! In the right climate they require very little care, in the wrong climate they can be notoriously stubborn and fickle. Today we will briefly cover different types of succulents, how to care for one and finally how to propagate your own succulents at home!

What is a succulent?
Succulents are easily recognized by their thick fleshy, often colorful, leafs which similar to cacti they use to store water during dry periods. Succulents exist among many different plant families including AizoaceaeCactaceaeCrassulaceae and many more. These plants thrive in dry climates and can survive with little rainfall or even an occasional misting if it's humid enough. One of the most common mistakes people growing succulents for the first time make is over watering - it may seem counterintuitive but these plants enjoy a bit of neglect, which we will cover in the next section.

How do I care for my succulents?
Succulents need bright indirect light for at least half of the day. (Tip* If growing indoors use a south facing window when possible!) Indirect light can be a bit hard to understand for novice plant owners,  indirect light occurs when a plant is in bright sunlight yet the sunlight is not falling directly on the plants foliage. One way to achieve this indoors is by using sheer curtains or wide opened blinds. Outdoors this can be achieved many different ways but you'll ideally want to find a spot that receives bright morning sun but is shaded by the late afternoon. Your succulents will let you know if they want more sunlight, they'll do this by growing taller and appearing "leggy" with larger spaces between the normally tight uniform leafs.

When it comes to water, these plants do not need much. I recommend checking the soil about once a week, longer if you live in a cooler humid climate. Allow your succulent plant to completely dry out before watering. When the soil is dry, water the plants soil thoroughly allowing the water to drain out completely - it is important that you do not allow your succulents to sit in water. Avoid soaking the leafs when watering as it can cause rot, water from the bottom when possible. If your climate is very dry, occasional misting will not hurt the plant.


Alright, I haven't killed it yet - how do I propagate more?
Succulents are one of the easiest, in my opinion, plants to propagate especially if its your first adventure into the world of plant propagation. There's no waiting months for roots to appear in water then praying that your plant takes to its new home in soil. (I'd like to note you actually CAN propagate most succulents in water, I've personally had little success with that method so it isn't what we are discussing today.) With succulents, the new plant just appears on the leaf or grows from a cutting, you pluck it off and put it in some soil then you're done! Sounds easy, right? It totally is! There are a few things you'll need to know though and some tricks you'll want to learn before you start your own succulent nursery.

First you'll want to know what kind of succulent you have. There are so many different genus of succulents that I cannot possibly discuss them all in this article so I will over the three I tend to see most commonly sold in nurseries near me which are Echeverias, Sedums and Aeoniums.

Echeveria photo from 123RF.com
Echeverias are known for their attractive opened rosette shape, often grown alone but also in clumps. They range in color from green to blue to red and every shade in between. Some of the most popular varieties of Echeveria are ‘Sagitta’, Echeveria ‘Green Abalone’ Echeveria ‘Latte Rose’ (Brown Ghost Plant) and Echeveria ‘Orion’. (Click here to view more echeveria!)
Sedum photo from costafarms.com
Sedums often have rounder fleshy leaves than echeveria and while some varieties can grow in a similar rosette pattern to echeveria, sedums also come in many other shapes and sizes too making them extra popular for adding texture to an opened air terrarium, hanging baskets or even as pariennal borders. My personal favorite is "donkey tail" (Sedum morganianum) a hanging succulent! Other popular sedums include Graptosedum ‘Francesco Baldi’ and Sedum ‘Little Missy’ – Little Missy Sedum. (Click here to view more sedums!)
Aeonium photo from worldofsucculents.com
Aeoniums can be easily confused with echeveria in that they too most commonly grow in a rosette formation. To help tell them apart take note of the stem, the stem of aeoniums are thicker and often grow "leggy". The leaf is attached to the stem by a thin membrane so when a leaf is plucked off it leaves only a small mark and the stem stays fully intact while when a leaf is plucked from an echeveria this membrane doesn't exist and there should be a small concave or divot in the stem. Some important things to know about this genus of succulents is that they die after flowering and cannot be propagated from a leaf but must be propagated from the stem. Popular aeoniums include Aeonium lancerottenseAeonium mascaense and Aeonium aureum (Green Rose Buds)


What you'll need:
  • A flat pan or container with raised edges (a normal pot works just as well, use what you have)
  • Succulent/cacti soil (store bought or home made)
  • Sharp sheers or scissors
  • A spray bottle filled with distilled water

Part One - Leaf Removal 
To remove the leaf for probogation from your plant gently twist and pull the leaf away from the mother plants stem. I find this method to be the most fool proof though you can also use sharp scissors or sheers to remove the leaf. Make sure to severe the leaf as close to the stem as possible.
Beheading is often done when a plant becomes too large for its pot, its leafs begin lacking uniformity, or its stem has grown long and leggy. When you behead the plant you remove the whole leafy 'head' of the stem leaving roughly about an inch of stem attached to the head for root formation. You can also leave the stump of beheaded plant in its pot and new growth will eventually form there as well!

Part Two - Dry it out!
Image from: shmarz at snapguides.
This is probably the most important step - LET THE LEAF/CUTTING CALLUS OVER! A plants callus is essentially the same as a human callus, its an accumulation of soft tissue cells that form over an opened wound and allow the healing process, or in this case the growth process, to begin!

Succulents MUST have this callus to grow properly. The most simple method is for your succulent leafs or cutting to be left out to air dry so they can form a callus at the point where it was removed from the mother plant. This callus seals the moisture inside and prevents extra water from being absorbed, it is also where new roots and new leafs will form. If you do not allow the callus to form your succulent leafs will absorb too much water too quickly and will eventually turn brown and soft then slowly rot away. I find 48 to 72 hours is the ideal timeframe to allow a callus to form, this time may vary depending on your climate. Experiment and find out what works for you! The image to your left shows an example of what a proper callus on a succulent looks like. It will be white or brown in color and solid.


Part Three - Placement & Watering.
Now you can propagate your succulents directly in water but today we are discussing the soil method. Fill your selected container with your succulent/cacti soil mix and smooth out the top of your soil. (See photo, right.) Place your succulent leafs directly on top of the soil, take care that the callused ends do not actually make contact with the soil. (See photo, left/below.)

A mature fully grown succulent doesn't require frequent watering - that's why we all love them, right? Your succulent leaf cuttings will, however, need quite a bit more water. What works best for me is a simple plastic spray bottle (I just picked one up from the dollar store) filled with distilled water. You are going to spray down your succulent leafs and soil with water each time the soil becomes dry. Try not to over saturate the leafs but make sure the soil is consistently nice and moist.
If you've opted for beheading you can place the nub of your succulent directly into soil and water thoroughly. Since these are already almost fully grown succulents roots should quickly begin to form underground. Water your now potted cutting each time the soil is dry until you see new growth, at that point you can cut back watering and treat it as any other mature succulent.


Part Four - Roots and Planting.
Now we wait... and wait.. and wait... and OH, IS THAT A ROOT? Eventually, usually in about 2 to 4 weeks, you are going to see small pink or white roots emerging from the callus on your succulent leafs - this is where the new succulent plant is going to form. For now just leave the leaf cutting alone and continue watching for new growth. Not every single cutting will not succeed so don't feel dismayed if a few rot, some only grow roots or some don't form the perfect little succulent rosette - all of this is totally normal.

Once the new plant begins to form you can place it into a pot with fresh succulent/cacti soil. Make sure to cover the roots at this point or your plant will eventually wither and die. At this point you can now move your new succulent baby to a lovely bright window or outside, it will take a long time for your new plant to become the size of those you find in stores but someday with proper care it will be all that and more.

Congratulations, you just propagated a succulent!

Wednesday, December 27, 2017

Gardening 101 - Part Three : Good Bugs vs Bad Bugs and Common Diseases


In the last installment of Gardening 101 we discussed soil profiles, compost and germination. So now your garden is growing, you have flowers all over your plants and even little fruits here and there when suddenly you spot a huge hole in a leaf on your eggplant, you lean in a little closer and OH MY GOD THAT IS A GIANT GRASSHOPPER. It is easy to see a bug in your garden and get spooked or totally grossed out but learning about what insects are visiting your garden is not only a great way to work on those phobias but it's also a great way to quickly spot problems and beneficial insects can even help you increase your harvest! Insects do a multitude of different things for our environment; they pollinate our plants, areteriate the soil, break down waste and serve as food for wildlife. Today we will discuss non-beneficial insects and beneficial garden insects as well as common diseases that may be plaguing your garden!


Bad bugs and creepy crawlies!


GRASSHOPPERS. Grasshoppers consume approximately one-half of their body weight per day so they can easily decimate an entire crop in one evening . Both adults and nymphs cause damage by chewing on the leaves and stems of plants, and if infestations are severe, may defoliate entire fields. 
Adults (1-2 inch long) are brown to reddish yellow or green in color with prominent jaws, fully developed wings and short antennae. They have enlarged hind legs and can jump great distances. Immature stages — nymphs — are similar in appearance to adults, but are smaller and have wing buds instead of wings. Control: Row covers are the best defense against these pests, I found they only attacked my garden at nighttime and that was also the best time to find them chewing away. Garlic spray and garlic plants are also good deterrents to put in place to ward off grasshoppers. You can also dust the plants with all purpose flour, this gums up the grasshoppers mouths preventing them from eating. 


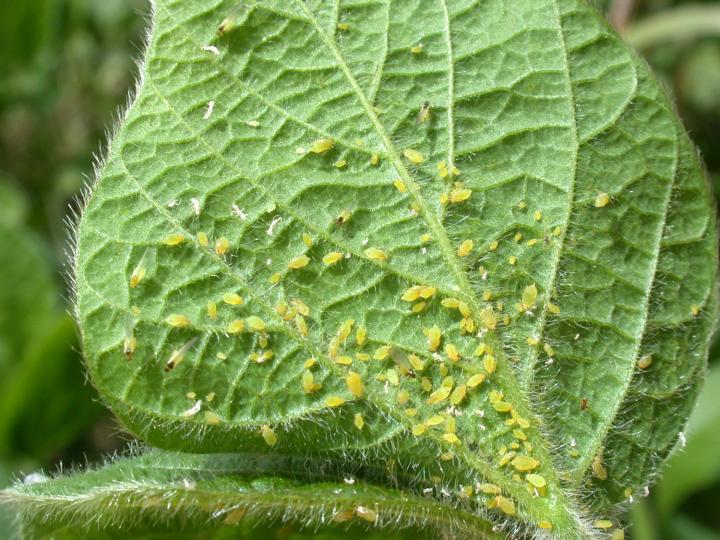
APHIDS. Aphids are small (1/8 inch long), soft bodied, pear-shaped insects that may be green, yellow, brown, red or black in color depending on species and food source. 
They tend to group together toward the base of the plant and on the underside of leafs as pictured left. Aphids secrete a a sticky fluid called honeydew as they eat your plants. This fluid drips onto plants, attracting ants and promoting mold growth on leaves. 
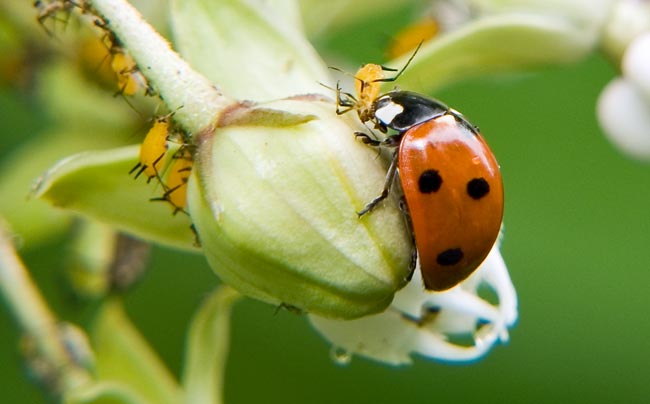
Control: Pruning off affected areas of the plant is an effective removal method if you've found them before the infestation has gotten bad. Another effective method is to turn your hose to its strongest setting and blast the plants with water, follow up with a soap spray and repeat as necessary every few days. Ladybugs also love to pest on this common pest.


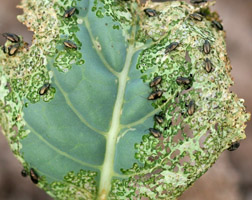
FLEA BEETLES. These bugs cause damage to plants by chewing  small holes in the leaves, which make them look as if they have been shot with a buckshot. They feed most on hot sunny days and attack a wide variety of plants, most plants actually.
Adults are small brown or black beetles with large hind legs that allow them to jump when disturbed much like the common house flea. Flea beetles transmit viral and bacterial diseases so wear gloves when tending to the pest and shake off clothing before entering your home. 
Control: The best way to eliminate these pests is with food-grade diatomaceous earth, this is a nontoxic compound that scorches the body the beetle as it crawls through the fine powder - you can also use this on household fleas and most beetle type pests. Row covers and sticky traps are also very effective in protecting plants from this pest.


SQUASH VINE BORERS. If one day your squash is suddenly wilted and limp, you might have some of these pests in your garden. Larva overwinter in the soil and can work their way into your plants stems, alternatively the adult moth (pictured left) will lay eggs at the base of the plant.
The adult is a moth about ½ inch long that looks a bit like a wasp with a black body, marked with orange-red. The hind wings are transparent and the front wings are metallic green. If you slit open a stem lengthwise with a sharp knife, you will see the borer larva. It resembles a maggot with its fat, white, wrinkled body and brown head; it can grow to about an inch long. 


TOMATO HORNWORMS. Don't let their name fool you, these little jerks will destroy much more than your tomato plants - they also feed on peppers, eggplant and other soft leaf fruit bearing plants. Unfortunately most gardeners don't realize this pest has made its way into the garden until they find a large patch of damage, these guys eat fast. Tomato hornworms are the caterpillar stage of the Sphinx moth (the same type on the cover of Silence of the Lambs) so if you see these moths fluttering around your garden - take action immediately! The caterpillars are 3-4 inches long,  they are green with seven diagonal white strips and a black or red horn projecting from the rear.  In their moth stage they are large (4-5 inch wingspan), heavy-bodied moths. They are gray or brown in color with white zigzags on the rear wings and orange or brownish spots on the body - they fly quickly and are able to hover like a hummingbird over flowers and plants. 

Tip from PlanetNatural: To find the larvae hidden among plants, look for black droppings (frass) on the leaves and ground and spray the foliage with water. The caterpillars will thrash about and give away their hiding spots.

Control:  The best method for removal of this pest is to simply pick it off your plants and either crush it by hand or toss the caterpillars into a bucket of soapy water. (If you have chickens, they love these as a treat!) A very effective caterpillar killer is bacillus thuringiensis (marketed as BT), this organic compound usually comes in powder form and you simply sprinkle it over the plant - however this kills ALL caterpillars and not just pests so if for example you have some lovely monarch caterpillars on your milkweed make sure to keep BT very far away.
My favorite method for dealing with this pest is, we will go into more detail on these wasps in the benefinical section of this article, to use these for prevention you release them early in the the season. The wasps lay their eggs on the hornworm which then feed on the insides of the hornworm until the wasp is ready to pupate, when the wasp bursts from inside the hornworm they will seek out other hornworms to infect and kill. So if you see a hornworm covered in little white bumps (photo right), do NOT kill or remove it from your garden - let the wasps do what they do best! 


Good Bugs! 

BEES. These little guys are easily the most important insect on the planet earth,without bees to pollinate we wouldn't have any of the fruits or vegetables we love so dearly. There are over 20,000 different species of bees in the world and each region has a host of different species native to their area. Bees live in colonies called hives and can fly as far as 2 miles (3 km) from their hive to collect pollen though some beekeepers have seen their bees as far as 4 miles from the hive foraging. 
The honey bee is responsible for approximately 80% of the pollination of fruits, nut, grains, and vegetables in the United States today. Honey bees are not native to North America; they were brought here by European settlers in the colonial days to pollinate their crops and for the products created or gathered by the honey bees-honey, propolis, royal jelly, pollen, and beeswax. Some plants to help attract bees to your garden are; lavender, sage, thyme, mint, sunflowers, rosemary, chives, beebalm, basil, catnip and any other herb or brightly color flowers.


LADYBUGS. These brightly colored insects are every gardeners favorite, instead of feeding on your crop ladybugs feed on aphids, mites, the eggs of pest insects and other various small soft-bodies creepy crawlies. You can buy live ladybugs at almost any organic gardening center or you can order live ladybugs offline for usually less than $20.00 - generally they come in a plastic or cotton container filled with hay, woodchips or straw and to release them into your garden gently shake them loose during a time of day when pest activity is high (usually early morning or early evening as the sun sets), if you are lucky they will thrive in your garden and lay eggs and continue to act as pest-control. Ladybug eggs are bright yellow balls clustered together on the bottom of a leaf or near the plants stem, their larva and pupa are brownish black with yellow spots - leave them be! 

Note from PlanetNatural: Larvae will eat approximately 400 aphids prior to pupating. Adults will consume more than 5,000 aphids during their lifetime. 

What is a Asian ladybug? These are pest insects that are cousins of the common ladybug. It can be hard to tell the difference between the Asian ladybug and beneficial common ladybugs, they are very similar in color though Asian ladybugs have a wilder variety of color in all shades of yellow to orange to red, if you look closely, you will see the Asian lady beetle has a white marking behind its head in the openings of what looks like a black M. Some also have dark black spots like common ladybugs, but  on many their spots are very light or they have none at all. 
During the 1980-90's the USDA released a very large amount of these Asian ladybugs in Southern United States and they reproduced and spread like wildfire. Unlike common ladybugs these Asian beetles can and will occasionally bite humans. These pests also like to find their way into your home and hide in cracks, crevices, drawers and pretty much anywhere they can fit which is everywhere - it is important to avoid smashing them if possible, they release a gooey yellow substance that smells fowl and will attract more Asian ladybugs, some people also are allergic to this substance and can have mild to severe reactions from hives to asthma attacks. 


Here is a fun story from my personal experiences with Asian ladybugs; back in my teenage years, I went on vacation to North Carolina with my then (now ex) boyfriend and his family. His family owned a small cabin up in the smoky mountains and to get to the cabin you must drive up the mountain it's settled on at a 70 degree angle (or at least it felt that way!) all the way until you reached a large gate, it wasn't until you walked around the cabin to the front porch, which all but sat hanging off the side of the mountain, that you realized how high up and tucked away you really were. The cabin was beautiful, wild blackberries grew along the sides of the mountain and when it rained you could watch the dense puffs of steam rise off the mountains, at the time the inside was mostly finished but it was clear there were renovations being done, regardless it had all the charm and coziness you dream of when you think about a tiny mountain cabin. 

So where do the asian ladybugs come in? During the drive from Tennessee to North Carolina, at some point, his mother turned around in her seat and ominously questioned me "have you ever seen 1,000 dead ladybugs?" I, of course, told her no and she explained the mass release by the USDA, how they've become such pests in the region and how without fail every spring when they returned to vacation at the cabin virtually every surface was covered in Asian ladybugs corpses from the winter - the problem is so common that most residents of the area keep their bedding and chairs covered in plastic! I thought this was an exaggeration until I saw it with my own eyes, hundreds of dead ladybugs. They were built up around the windows, in corners and mostly floating in anti-freeze filled toilet and sink. I recall it taking several hours to clean up and each day we were greeted by new ladybugs - probably seeking revenge, if I had to guess. Moral of this story? These things get out of hand quick! Always make sure whatever you plant or release is native to your area and will not overwhelm the local ecosystem. 


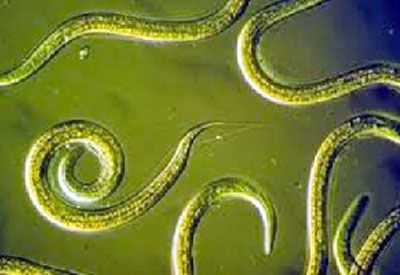
NEMATODE. The question you're probably asking yourself right now is; what the heck is that photo of and what the heck is a nematode? Firstly, those a nematodes under a microscope. Secondly, a nematode is a microscopic parasite closely related to roundworms and threadworms. These little guys are EVERYWHERE, from the lowest valley to the tops of the highest mountains. While some types of nematodes do cause sickness and diseases in humans and animals, the type we are discussing today do not. 
Beneficial nematodes work by actively seeking out and attacking pests that harm plant life, nematodes destroy over 150 different types of insects that live in soil or mature in the ground. These include weevils, beetles including roaches, fleas, borers and gnats.  Beneficial nematodes do not attack earthworms or most other beneficial insects. They’re excellent for use in lawns, in gardens and around trees and shrubs. They need generally moist condition to facilitate their movement. 


PRAYING MANTIS. 
Large, green or tan praying mantis are most often sold as egg cases which can yield up to 200 and more small adults (some pet stores carry single mature adults for housing in terrariums and other enclosed environments). Two to three weeks of warm temperatures allow the eggs to hatch. The newly hatched insects squeeze through the egg sac, leaving it intact and disperse quickly without leaving behind a clue that hatching has occurred. It takes as much as five months for mantises to reach full size.  These critters feed on pests such aphids, leafhoppers, mosquitoes, caterpillars and other soft-bodied insects when young. Later they will eat larger insects such as beetles, roaches, grasshoppers, crickets, moths and even locusts! 


TIPS ON RELEASE FROM PLANETNATURAL:

  • Use 3 egg cases for small areas — under 5,000 sq ft — and increase the amount accordingly for larger areas. 
  • Tie each egg case to twigs or branches about three feet above the ground. Birds and rodents will feed on egg cases. 
  • Placing them in a container with holes large enough for the nymphs to escape — 1/4 to 1/2 inch diameter — will provide protection.


PARASITOID WASPS. Just like there are thousands of different types of bees, there are thousands of different types of wasps. When a gardner refers to parasitoid wasps they could be referring to several different kinds depending on what their pest problem is. Generally speaking these tiny wasps, which are not harmful to humans at all and do not sting, reproduce and act in the same manner. They infect the larva of immature stages of various pests with their own eggs and those eggs feed off the pest until they themselves mature then the adult wasps will seek out more pests to continue the cycle.


Common Plant Diseases   
There are many times when the problems you'll encounter in your garden are not the cause of pests but of different fungi sapping the life from your plants. Here are few of the most common plant diseases and some simple remedies. 


BLOSSOM END ROT: This is a common disease most gardeners, especially busy gardeners, will encounter at least once. This generally occurs on tomatoes but can also affect peppers and other fruits in the nightshade family. 
Blossom end rot is caused by a few different things; a lack of calcium, too much salt, lack of/over watering or rapid growth. This disease manifests itself on both ripe and unripe fruit, soggy spots will appear at the bottom of the fruit (where the blossom was) and will eventually turn brown and ruin the fruit by causing mold or attract pests. This disease will not spread from plant to plant so focus on treating the affecting plants only. To treat and prevent this disease you can; till eggshells or bone meal into the soil before planting (you can purchase calcium sprays from your local garden center too), use chopped leafs, straw or undyed wood chips as mulch to prevent moisture from leaving the soil, and avoid over fertilizing with commercial brand fertilizers that are high in nitrogen.   


RUST: Rust affects many different vegetation, flowers and trees. There are over 4,000 different varieties of rust, rust first appears on the underside of leafs and toward the lower parts of the plant. It is a raised bright golden or orange spots that appear very much like rust, as the fungi grows spores small fuzzy spots in red or black may appear and then will spread via wind to other nearby plants. 
Rust likes warmth, humidity and darkness so making sure your plants get plenty of light and are pruned so air can flow freely is a big help to preventing this fungi. Water in the morning to prevent excess moisture retention and water only at the base of the plant, do not soak the leafs. You should prune off and dispose of effected leafs and stems - DO NOT COMPOST THEM. You can also purchase organic sprays and powders if the disease has gone unchecked for too long. 


POWDERY MILDEW: This is probably the most common fungi in North America, it affects almost all types of plants and is easily identified by powdery white areas on the top of young leafs. The fungi begins as tiny raised bumps near the edges of the leaf causing it to warp and curl before the white powder mildew appears. Prune and destroy effected leafs and plants and make sure plants have good ventilation and air flow to prevent further development. Keep excess yard and plant debris away from young susceptible plants and water in the morning before the heat of the day.


FUSARIUM WILT: I wanted to cover this disease because it is every gardeners worst fear. This disease generally will go unnoticed until it is too late for you to do anything and it can survive for years in the soil. Fusarium wilt is a soil borne pathogen that affects potatoes, tomatoes, peppers and other members of the nightshade family. It enters your plants through the roots and causes the plants leafs to yellow, wither and die. It then slowly works its way up your plant from larger mature leafs to younger leafs. This disease is spread by wind, water, pests and infected gardening tools - unlike some of the other diseases we covered today this one thrives in dry weather with hot temperatures. 
When you notice this disease you should immediately prune effected areas away and sterilized your pruning sheers before using them again - throw the clipping away or destroy them. DO NOT COMPOST FOR ANY REASON. You can purchase sprays and compounds to combat the disease but if you are unable to destroy the disease you should replace the soil in your garden beds or solarize your garden soil. 


VERTICILLIUM WILT: This disease is very similar to fusarium wilt in appearance but unlike fusarium wilt this disease is much more persistent and can survive cold weather and overwinter much more easily. Study has shown that crop rotation is very helpful in the prevention of this disease, since the pathogen develops in the soil it will grow in strength in the same unaltered environment so by rotating crops with more resistant varieties the disease cannot thrive. 


Thursday, November 16, 2017

Gardening 101 - Part One : Garden Basics, Winter gardens and Seeds


Today is the first day that it actually feels like winter in Florida. The sky is wholly gray and there's a wonderful chill in the air - I love it! One of the best parts, in my opinion, of living in the south is year round gardening. No matter what time of year it is there is something you can grow!

 
Recently I planted the first of my winter vegetables (broccoli pictured right) and after only five days, they sprouted and I am both surprised and ecstatic! I planted broccoli, cauliflower and I also prepared a bed for my buttercrunch lettuce by adding new fertilizer to the soil but haven't been able to make it home in time before dark to get those seedlings into the ground.

In this post today I am going to cover the basics of winter gardening, how to pick the best vegetables to grow for your area and perhaps add a few snippets of information on some of my favorite winter crops.


It is always best to start at the beginning... 

Winter gardening is not practical everywhere and it certainly isn't easy. There are many things the southern gardener must consider; frost dates, cold winds, and even hard freezes. These weather events can completely devastate an entire crop if you don't take the proper precautions or plan ahead. 
So when do you start planting for the winter and what plants do you choose? These are the first questions you will need to answer and I am here to help!

The first step to determining when and what to plant is to find out which USDA hardiness zone you reside in. The USDA planting/hardiness zone map is a tool used by gardeners to aid them in choosing what type or variety of plant will grow best in their microclimate.
The hardiness map first came about in 1938 and was created by the U.S. National Arboretum and consisted of 8 zones, this map was used until 1960 when a man in the organization named Henry Skinner updated the map changing the correlating temperature variations to a set 10 degrees. This USDA version of the map was much more popular and by 1965 Florida was added to the hardiness map. This map was the industry standard until 1990.
Over the years the map, as most maps do, became less and less accurate due to things like climate change and colonization, in response the USDA added new zones such as Canada and Mexico and added additional levels of zone variation. Each zone stayed separated by a 10 degree variance but gained A and B sections of additional 5 degree variations within the zones making it more accurate than ever before.

Several more years passed and the map underwent different updates of varying significance, some of the most notable in 2006 when a study was released showing the zones were moving northward as climate change caused the earth to warm. In 2012 two more new zones were added to the map and in 2015 the Arbor Day Foundation released an even newer version of the map.
Today the zone map consists of a number system 11 through 0 and those numbers represent the minimum temperatures a plant can withstand within that zone so, for example, if a plant is labeled as hardy in zone 10 then the minimum temperatures it can withstand are -1 °C (30° F) and so on. 
My zone is 8b, north Florida so when I shop for seeds I look on the packaging or within the product information online for varieties that correspond with that zone or are at least in zone 8 or 9. (Note* most gardening websites will let you sort products by zone!) 
To figure out which zone and sub-section of that zone you reside in click here

So we've found your hardiness zone, now what? Picking out your plant and seed babies, of course! This is the fun part. Since primarily we are discussing winter gardening in this article I am going to stick to edibles that grow well in cooler weather only. 
So what are some edibles that enjoy a nice chill or even REQUIRE one? There are actually quite a lot to choose from! Some of these are more cold hardy than others but all of these vegetables do best when grown in cool temperatures.
  • Arugula 
  • Beets
  • Bok choy
  • Broccoli
  • Brussels sprouts
  • Cabbage
  • Collard Greens
  • Cauliflower
  • Celery
  • Chard
  • Fennel
  • Kale
  • Lettuce
  • Onions (bulbing and bunching)
  • Peas
  • Spinach
Alright, so you've picked out the types of vegetables you want to grow, now we need to pick the variety and type. When picking out seeds or seedlings you'll want to pay attention to things like days to harvest (I like to get a few different varieties with different days to harvest to keep a steady supply of vegetables rolling in, alternatively you can plant seedlings a week or so apart), hardiness zone, hours of sunlight, seed type and temperature preferences. You can find all of this information and more on the back of your seed packet or if you are shopping online in the product description. 
For the beginner gardener I would suggest starting out with hybrid varieties or GMO seeds verses no-gmo or heirloom type seeds.

The benefits to using GMO varieties, especially for cold weather gardening, are that they are generally bred to be more resistant to pests, diseases and yes even sudden shifts in temperature. 
Hybrid seeds share a lot of these same protective traits with GMO type seeds and hybrids can produce some of the most interesting and beautiful plants of all! 
The downside? Because hybrid plants are created using cross-pollination you cannot harvest seeds from hybrid plants and get the same plant from those seeds so if you want to grow the same variety again the next year, you will have to purchase the seeds again. This is great for big seed companies, not so much for home gardeners or small farms who want to save seeds for repeated use or sharing. Now you may be thinking, but Jess what if I DO save the seeds and grow them then what happens? The answer is simple, your seeds will likely sprout and produce but the offspring will not be like the hybrid plant you harvest the seeds from, more likely it will be like one of the parent plants the hybrid was created from. 
Example* you have a hybrid flower that is yellow with white stripes and has large dark green leafs. It produces seeds and you plant them, when the plant flowers, the flower it produces is plain white and its leafs are more narrow and lighter in color. The plant may be weaker and less vigorous as well - now it is possible to stabilize hybrid seeds but the process is long arduous one and just in general isn't worth the supreme time and effort involved! 

As you progress on your gardening journey you may want to experiment with heirloom seeds and that is always great fun! Some of my summer favorites are heirlooms and organic varieties like Black Krim tomatoes and Red Burgundy okra. A few of my favorite winter heirloom/organic varieties are Buttercrunch lettuce, Broccoli de Ciccio, and Sicilian Violet Cauliflower.  

Some vegetables are sensitive and you will want to purchase seedlings rather than plants or start them indoors in trays then transplant them into your garden when they're strong enough or displaying true leafs. 
  • Broccoli (In zones 8 - 10 you can sow directly into soil)
  • Cabbage (In zones 9 - 10 you can sow directly into soil)
  • Cauliflower (In zones 8 - 10 you can sow directly into soil)
  • Celery
  • Kale
  • Leeks
  • Most Onions
  • Scallions


Part Three : Pests and Diseases - Coming soon
Part Four : Harvest and Seed Saving - Coming soon