Showing posts with label science. Show all posts

Tuesday, April 2, 2019

Propagating Succulents like a Pro - Easy DIY Gardening Project


Succulents are fun, colorful and easy to grow as long you give them the correct conditions! In the right climate they require very little care, in the wrong climate they can be notoriously stubborn and fickle. Today we will briefly cover different types of succulents, how to care for one and finally how to propagate your own succulents at home!

What is a succulent?
Succulents are easily recognized by their thick fleshy, often colorful, leafs which similar to cacti they use to store water during dry periods. Succulents exist among many different plant families including Aizoaceae, Cactaceae, Crassulaceae and many more. These plants thrive in dry climates and can survive with little rainfall or even an occasional misting if it's humid enough. One of the most common mistakes people growing succulents for the first time make is over watering - it may seem counterintuitive but these plants enjoy a bit of neglect, which we will cover in the next section.

How do I care for my succulents?
Succulents need bright indirect light for at least half of the day. (Tip* If growing indoors use a south facing window when possible!) Indirect light can be a bit hard to understand for novice plant owners,  indirect light occurs when a plant is in bright sunlight yet the sunlight is not falling directly on the plants foliage. One way to achieve this indoors is by using sheer curtains or wide opened blinds. Outdoors this can be achieved many different ways but you'll ideally want to find a spot that receives bright morning sun but is shaded by the late afternoon. Your succulents will let you know if they want more sunlight, they'll do this by growing taller and appearing "leggy" with larger spaces between the normally tight uniform leafs.

When it comes to water, these plants do not need much. I recommend checking the soil about once a week, longer if you live in a cooler humid climate. Allow your succulent plant to completely dry out before watering. When the soil is dry, water the plants soil thoroughly allowing the water to drain out completely - it is important that you do not allow your succulents to sit in water. Avoid soaking the leafs when watering as it can cause rot, water from the bottom when possible. If your climate is very dry, occasional misting will not hurt the plant.


Alright, I haven't killed it yet - how do I propagate more?
Succulents are one of the easiest, in my opinion, plants to propagate especially if its your first adventure into the world of plant propagation. There's no waiting months for roots to appear in water then praying that your plant takes to its new home in soil. (I'd like to note you actually CAN propagate most succulents in water, I've personally had little success with that method so it isn't what we are discussing today.) With succulents, the new plant just appears on the leaf or grows from a cutting, you pluck it off and put it in some soil then you're done! Sounds easy, right? It totally is! There are a few things you'll need to know though and some tricks you'll want to learn before you start your own succulent nursery.

First you'll want to know what kind of succulent you have. There are so many different genus of succulents that I cannot possibly discuss them all in this article so I will over the three I tend to see most commonly sold in nurseries near me which are Echeverias, Sedums and Aeoniums.

Echeveria photo from 123RF.com
Echeverias are known for their attractive opened rosette shape, often grown alone but also in clumps. They range in color from green to blue to red and every shade in between. Some of the most popular varieties of Echeveria are ‘Sagitta’, Echeveria ‘Green Abalone’ Echeveria ‘Latte Rose’ (Brown Ghost Plant) and Echeveria ‘Orion’. (Click here to view more echeveria!)
Sedum photo from costafarms.com
Sedums often have rounder fleshy leaves than echeveria and while some varieties can grow in a similar rosette pattern to echeveria, sedums also come in many other shapes and sizes too making them extra popular for adding texture to an opened air terrarium, hanging baskets or even as pariennal borders. My personal favorite is "donkey tail" (Sedum morganianum) a hanging succulent! Other popular sedums include Graptosedum ‘Francesco Baldi’ and Sedum ‘Little Missy’ – Little Missy Sedum. (Click here to view more sedums!)
Aeonium photo from worldofsucculents.com
Aeoniums can be easily confused with echeveria in that they too most commonly grow in a rosette formation. To help tell them apart take note of the stem, the stem of aeoniums are thicker and often grow "leggy". The leaf is attached to the stem by a thin membrane so when a leaf is plucked off it leaves only a small mark and the stem stays fully intact while when a leaf is plucked from an echeveria this membrane doesn't exist and there should be a small concave or divot in the stem. Some important things to know about this genus of succulents is that they die after flowering and cannot be propagated from a leaf but must be propagated from the stem. Popular aeoniums include Aeonium lancerottense, Aeonium mascaense and Aeonium aureum (Green Rose Buds)


What you'll need:
  • A flat pan or container with raised edges (a normal pot works just as well, use what you have)
  • Succulent/cacti soil (store bought or home made)
  • Sharp sheers or scissors
  • A spray bottle filled with distilled water

Part One - Leaf Removal 
To remove the leaf for probogation from your plant gently twist and pull the leaf away from the mother plants stem. I find this method to be the most fool proof though you can also use sharp scissors or sheers to remove the leaf. Make sure to severe the leaf as close to the stem as possible.
Beheading is often done when a plant becomes too large for its pot, its leafs begin lacking uniformity, or its stem has grown long and leggy. When you behead the plant you remove the whole leafy 'head' of the stem leaving roughly about an inch of stem attached to the head for root formation. You can also leave the stump of beheaded plant in its pot and new growth will eventually form there as well!

Part Two - Dry it out!
Image from: shmarz at snapguides.
This is probably the most important step - LET THE LEAF/CUTTING CALLUS OVER! A plants callus is essentially the same as a human callus, its an accumulation of soft tissue cells that form over an opened wound and allow the healing process, or in this case the growth process, to begin!

Succulents MUST have this callus to grow properly. The most simple method is for your succulent leafs or cutting to be left out to air dry so they can form a callus at the point where it was removed from the mother plant. This callus seals the moisture inside and prevents extra water from being absorbed, it is also where new roots and new leafs will form. If you do not allow the callus to form your succulent leafs will absorb too much water too quickly and will eventually turn brown and soft then slowly rot away. I find 48 to 72 hours is the ideal timeframe to allow a callus to form, this time may vary depending on your climate. Experiment and find out what works for you! The image to your left shows an example of what a proper callus on a succulent looks like. It will be white or brown in color and solid.


Part Three - Placement & Watering.
Now you can propagate your succulents directly in water but today we are discussing the soil method. Fill your selected container with your succulent/cacti soil mix and smooth out the top of your soil. (See photo, right.) Place your succulent leafs directly on top of the soil, take care that the callused ends do not actually make contact with the soil. (See photo, left/below.)

A mature fully grown succulent doesn't require frequent watering - that's why we all love them, right? Your succulent leaf cuttings will, however, need quite a bit more water. What works best for me is a simple plastic spray bottle (I just picked one up from the dollar store) filled with distilled water. You are going to spray down your succulent leafs and soil with water each time the soil becomes dry. Try not to over saturate the leafs but make sure the soil is consistently nice and moist.
If you've opted for beheading you can place the nub of your succulent directly into soil and water thoroughly. Since these are already almost fully grown succulents roots should quickly begin to form underground. Water your now potted cutting each time the soil is dry until you see new growth, at that point you can cut back watering and treat it as any other mature succulent.


Part Four - Roots and Planting.
Now we wait... and wait.. and wait... and OH, IS THAT A ROOT? Eventually, usually in about 2 to 4 weeks, you are going to see small pink or white roots emerging from the callus on your succulent leafs - this is where the new succulent plant is going to form. For now just leave the leaf cutting alone and continue watching for new growth. Not every single cutting will not succeed so don't feel dismayed if a few rot, some only grow roots or some don't form the perfect little succulent rosette - all of this is totally normal.

Once the new plant begins to form you can place it into a pot with fresh succulent/cacti soil. Make sure to cover the roots at this point or your plant will eventually wither and die. At this point you can now move your new succulent baby to a lovely bright window or outside, it will take a long time for your new plant to become the size of those you find in stores but someday with proper care it will be all that and more.

Congratulations, you just propagated a succulent!
Monday, November 27, 2017

Gardening 101 - Part Two : Soil. Compost. Planting and Garden Maintenance


In the last installment of this gardening series we covered the bare basics - what to plant and how to choose. The advice I gave in the last installment focused primarily on winter gardening, but I  have decided that for the rest of this series I would keep things more general to make it more helpful for everyone everywhere and I'll add winter tips where it is appropriate within the articles.

Today in part two of our gardening 101 series, we will address the following; What is germination? It is necessary? What is soil and how to prepare your soil for planting, what is composting and much more!


Soil and why it's the most 
important aspect of your entire garden..
I dare you to try and find a gardener to believes different! Soil is the base of every healthy and high yield garden. Selecting fertilizers and preparing your soil is an important part of planning your garden. But before we get into the types of soil and what plants grow best in them though let's discuss what soil actually is and what it is so important to not just your garden but also to life itself.


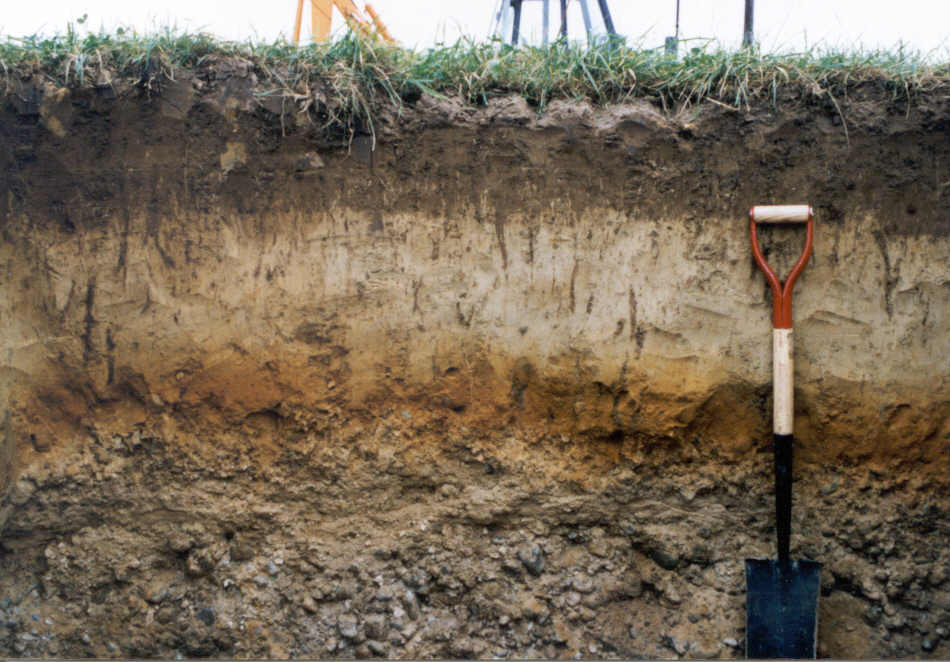
Image: nesoil.com
According to the USDA: 
"Soil is a natural body comprised of solids (minerals and organic matter), liquid, and gases that occurs on the land surface, occupies space, and is characterized by one or both of the following: horizons, or layers, that are distinguishable from the initial material as a result of additions, losses, transfers, and transformations of energy and matter or the ability to support rooted plants in a natural environment."
So from this definition we can deduce that soil is really just decomposed dead stuff - leafs, rocks, plant matter, fecal matter, and even dead animals arranged in naturally occurring layers, called horizons in earth science.
Soil is a non-renewable resource on earth. It is considered such because it's loss cannot be recovered within a single human lifespan. According to the FAO (the food and agriculture organization of the United Nations) it is estimated that 33% of land is moderately to highly endangered and degraded due to soil erosion, acidification and chemical pollution.
In gardening we concern ourselves mostly with horizon A - topsoil.  Due to the above factors, as well as other local environmental conditions, many gardeners are very picky about where their topsoil comes from - myself included. Very few gardeners are lucky enough to live in an area where flat earth gardening is possible without enriching the soil profile - which can be a process that takes months or even years. So how do we enrich our soil? There are lots of chemical fertilizers you can purchase or industrial composts that will do the trick quickly however we are only focusing on organic alternatives today - they may take longer but it is well worth it in my opinion. Another alternative is in lieu of flat earth gardening, try raised bed gardening. There are many advantages to raised beds especially if you are a beginner gardener or live in an area where your local soil profile isn't ideal for planting, including critter, soil and weed control.


Compost - it's more than just poop!
Composting is a great way to not only recycle your scraps but also to improve your overall soil profile and achieve an ideal loamy* topsoil. The easiest way, for me personally, to tell if compost is good and ready is to smell it, but I don't mean that it smells in a bad way. Good compost smells like earth right before the rain mixed with fresh cut grass. You can use it in several ways; by tilling it into your soil, by dressing the roots of your seedlings during planting or as a mulch to fertilize your mature plants.

Composting is a natural process that occurs when certain aerobic conditions are present. Composting begins process, various microorganisms, including bacteria and fungi, break down organic matter into simpler substances. The effectiveness of the composting process is dependent upon the environmental conditions present within the composting system i.e. oxygen, temperature, moisture, material disturbance, organic matter and the size and activity of microbial populations.
Composting is not a mysterious or complicated process. Natural recycling (composting) occurs on a continuous basis in the natural environment. Organic matter is metabolized by microorganisms and consumed by invertebrates. The resulting nutrients are returned to the soil to support plant growth.

Compost has 4 components green materials, brown materials, water and oxygen.
Greens are materials are rich in nitrogen which your plants need to grow big beautiful green leafs. We call them greens because they are fresh and moist. Examples of greens are; coffee grounds & paper filters, vegetable scraps, fresh plants & leafs, grass clippings and manure (preferably cow, rabbit or horse)
Browns are materials that are rich in carbon which is needed to break down the materials you add to the pile. Carbon is what feeds the microbes that aid in natural decomposition. Examples of browns are; dead leafs, old bread, straw & hay, wood chips, undyed hair clippings, dryer lint and eggshells. 
There are certain materials you may think would be fine to add to your compost pile but a few of the things you should NOT compost are; weeds. charcoal, diseased plants, cat & dog manure/urine, meat scright, bone, dai90 products and chemical treated lumber & sawdust.

There are two types of composting hot and cold.
Hot composting is the most common type of composting, it involves using 2 parts carbon to 1 part nitrogen which causes the pile to literally heat up. If this is done correctly your compost pile will reach temperatures up to 155° F within 24-48 hours. A hot compost generally yields usable compost within a matter of weeks. 
In hot composting you will need to turn your pile at the least once weekly. Additionally you should make sure to maintain it's dampness levels close to that of a rung out washcloth - the more frequently you turn your pile and allow more oxygen to enter the faster the process.
Cold composting requires very little effort but can take upwards of a year depending on the size of your compost pile to produce useable compost. To cold compost you add your greens and browns as you acquire them, I recommend chopping up your materials to accelerate the rate of decomposition. Cold composting is right for you if you have lots of space and little time to tend to your compost pile.


 Germination before planting - when and why?


Germination is the process by which seeds develop into seedlings and then into plants. Seeds undergo germination when they are planted at the correct dept in soil, under the correct temperature and under the correct moisture conditions. During germination the seed soaks up water in a process called imbibition*, that process activities certain protein enzymes which cause the seeds to develop into a seedling then into a plant.

There are many factors that can influence seed germination but the most important are water, light and temperature. The seeds must remain moist enough to go through imbibition but if they are too moist they may not develop correctly and can be "drowned". 

Temperature can be tricky, the temperatures at which you seeds will germinate depend very much on what kind of seeds they are. Some seeds need cold weather to germinate such as broccoli, blueberry and other northern plants. On the other hand some plants need extreme heat to germinate like pine after forest fires. Additionally the seeds must receive enough light so that the shoot pierces the soil and develops proper leafs, some plants however require total darkness to germinate then may be moved into different lighting conditions. This is information you'll usually find on your seed packets or under product description.


So how do you know if you need to germinate your seeds before planting in the garden? Generally the package will tell you, but a quick google search can never hurt. I recommend checking the farmers almanac website. Other reasons for germination prior to planting are climate, if you live somewhere with long winters you may choose to use a greenhouse to jump start your growing season.
Many vegetables do best or even require you to germinate your seeds outside of the garden bed in trays then they are transplanted into the garden when they are strong enough - examples are; eggplant, tomatoes, peppers, onions, kale and more. Some vegetables will easily germinate without assistance other than watering when the seed is planted directly into the ground - examples are squash, beans, carrots, peas and spinach. 


Garden Maintenance and Watering..


Your garden needs your attention, just like your home and pets. Neglecting your garden will lead to lower yields, pest problems, weed problems or even the loss of an entire harvest. I use my planner and journal to track my garden maintenance, I will attach a simple SPRING check-list that I found very helpful prior to my planner obsession. You may print and utilize this list by clicking here. 

Depending on your climate and what you're growing you may need to water certain plants more frequently than others (if you live in a very hot climate for example) but in general your plants will want about 1-2 inches of water per week. 
It is very important to water your plants regularly, preferably at the same time of day each day if possible. 
If your plants don't get enough water they may not fill out properly and may be too thin or large on one end and small on the other. Tomatoes will crack if they receive a sudden influx of watering after a long period of neglect. You should also take note and only water at the base of the plant, avoid saturating the leafs or fruits with water as this came increase pest activity and also cause fungi or mold problems.
Other common maintenance is weeding your garden bed, this is important because weeds steal food and water from your plants inhibiting growth and sometimes fruit production. Mulching your plants is beneficial for a few reasons, it helps keep soil moist, slows down weed growth and keeps the plants roots from overheating or being exposed to pests. You should mulch your plants seasonally with compost, shredded leafs or other organic mulches - NEVER use wood chips to mulch your garden. Wood chips contain dyes, chemicals and often mushroom spores. Other garden maintenance you'll want to keep up with is  checking or signs of pest activity, trimming dead limbs, harvesting your 


Part Two : Soil, Compost, Planting and Garden Maintenance
Part Three : Pests and Diseases - Coming soon
Part Four : Harvest and Seed Saving - Coming soon

*Imbibition: A special type of diffusion when water is absorbed by solids-colloids causing an enormous increase in volume. Examples include the absorption of water by seeds and dry wood.
*loamy: The type of soil that gardens and gardeners love is loamy soil. It contains a balance of all three soil materials—silt, sand and clay—plus humus. It has a higher pH and calcium levels because of its previous organic matter content. Loam is dark in color and is mealy—soft, dry and crumbly—in your hands. It has a tight hold on water and plant food but it drains well, and air moves freely between soil particles down to the roots.


Sources: nesoil, FAO offical, the free range life, agverra, the farmers almanac, deep green permaculture